Get Maximum Productivity from your Takatori Wire Saw with these 5 Best Practices
You’ll get the most out of your Takatori wire saw when you follow this guide to best maintaining and repairing these five crucial parts. The result will be faster changeovers and maximum machine run time. A key concept to remember is that the cycle time on a multi-wire saw is often quite long and operator intervention is rarely required, so you should take advantage of this time to prepare for the next run.
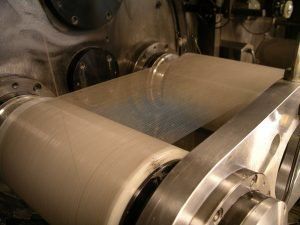
1. Workrollers
Have your new work rollers out and ready when it’s time to turn the machine around. Use a work roller cart to safely remove the old rollers and to place the new ones onto the machine. Make sure to follow the detailed instructions for disassembling and reassembling the front yoke bearing assemblies – seating the work rollers and bearings is critical for proper operation of the machine.
2. Pulleys
Pulleys need to be changed occasionally as they wear during the slicing process. Overly worn pulleys can lead to wire breaks, so make sure to inspect them for wear frequently when a process is new to determine the best replacement schedule. Pulleys closer to work box may wear faster, so make sure to check all pulleys.
In order to speed up replacement, you can purchase a second set of pulley assemblies and bearings, meaning that you can set up a new pulley on each assembly while the machine is running. Switching out the assemblies is then quite fast, speeding up your turn around.
3. Re-winding
Takatori wire saws are uniquely self-winding, with a program managing the placement of wire onto the work rollers. Up to 100 different winding programs can be stored on the machine. Use block winding programs to leave gaps in the wire web if desired, or use skip winding to slice different thicknesses using the same set of work rollers. Save your programs to more quickly set up the machine.
4. Loading
If your work is heavy make sure to a cart to safely remove the cut pieces and place the new workpiece into the machine. Make sure to have multiple mounting plates so that you can mount new workpieces with enough time for the epoxy to cure while the machine is running.
5. Slurry Preparation
Slurry needs time to ensure proper mixing. Once again, this can be done while the machine is running in order to save time. A dedicated slurry mixing tank can be as simple as an appropriately-sized container and an impeller, allowing you to pre-mix abrasive and the vehicle (generally oil or glycol).
Your GTI engineer can also work with you on progressive slurry replacement, which allows for a more stable process by replacing only a small amount of the slurry from time to time.
If you have any questions please contact GTI at +1 203 929 2200.